Monday, November 12, 2007

ICAITU013C Integrate commercial computing packages

ICAITU013C
Integrate commercial computing packages
Introduction
The Integrate commercial computing packages unit is designed to help you integrate the skills gained during the Level II Information Technology course. The unit concentrates on producing workplace documents with at least three commercial software application packages.
On completion of this unit, you should be able to apply appropriate conversion formats and manipulate data between commercial application software.
Elements of competency for the unit are as follows:
Produce required organisational documents
Appropriate packages and conversion techniques are used to achieve an integrated outcome
Data is imported/exported to produce required outcome
Data is saved and re-accessed without loss of data
Determine and use self help
Help is accessed through online help and manuals
Internal organisation client documentation is obtained and used
Glossary
Produce required organisational documents
Appropriate packages and conversion techniques are used to achieve an integrated outcome.
1. File extensions
2. Saving documents in different file formats
3. File compression
4. Extracting files from an archive
5. Creating an archive
6. File formats
The Windows operating system has made it simpler to share data among computer program applications such as word processors, spreadsheets, databases, graphic packages and so on. A user can create data in one application and then very easily share that data by importing or exporting it to another application by using the windows ‘clipboard’ facilities or by saving the file in a format that another application can open.

Please note that the activities and exercises are mostly based around using the Microsoft® family of products, including Windows XP and Office XP. However the ideas and concepts can be used in most other current computer applications.
Tip: For the following activity, if you cannot see the file extension in Windows Explorer, use the menu, look for and remove the tick that states ‘Hide Extensions for Known File Types’.
File extensions
Each Windows application has a file extension associated with it that is used when saving a document (sometimes referred to as a file). An extension simply describes the document to Windows and also the programs on your computer. You may have noticed that when you view files with Windows Explorer, most have a certain icon attached to them. This icon is derived from the file extension. The figure at right shows an example image from Windows Explorer that has the icons associated with the file names.
Notice how the file called solver_examp.doc has the Microsoft Word icon attached to it, the file called ASSESS3.MDB has the Microsoft Access icon attached to it and the file called Orders_filterex.xls has the Microsoft Excel icon attached to it. When you save a document, the applications program gives it a default file extension. Therefore, when you double click a document within Windows Explorer or My Computer, this action will open the program and also the associated document.
Activity 1 – Saving a file and then opening it from Windows Explorer
Open the Microsoft Word program on your computer. This should load the program and also create an empty Word document.
For this exercise, simply type your first and last name into the document.
Select and from the menu and save the document into the ‘My Documents’ folder on your computer. For the exercise simply call it ‘ex_open’. Notice how the default file extension is .doc.
Close the Microsoft Word program.
Open the Windows Explorer program and navigate to the ‘My Documents’ folder on your computer. The ex_open.doc document should have the Microsoft Word Icon attached to it.
Double click the document and notice how it opens the Microsoft Word program and also ex_open.doc at the same time.
Tip: You can create a shortcut on the Windows Desktop to any document on your computer. Simply right click on the document and select the option to ‘Create Shortcut’. If you then double click the document from the desktop it will open the associated program and also the document at the same time.
Exercise 1
Create some documents in other applications on your computer. Use the techniques described in the previous activity and save and open the various documents.
Please note that there is no suggested answer for this exercise.
Saving documents in a different file format
When you save a document, you have the option of saving it in a different format other than the one associated with the program you are using. For example, you could save a Word document as an HTML document, WordPerfect® document or a Microsoft Word document. You could also save a Microsoft Excel document as an HTML document or as a Lotus123® document. When a document is saved in another format, the file extension name changes, (in most cases), and that file can then be opened in the other application program. Generally, any formatting or special features created in the original document are maintained.
Most application programs keep the same file extension names through different versions of their products. For example, Microsoft Word has kept the .doc extension through all versions of its program. Excel has also kept the .xls extension through all its versions, as Access has kept the .mdb extension. When you save a file in a different format, you have the option of saving to an earlier version of the same program. In this case, the extension will still be the same but the document can be opened in earlier versions of the program. This feature can be useful if you create a document at school on one version of the program and then take it home for further use, but you have a different version of the application at home.
Activity 2 – Saving documents with different extensions
This activity will give you practice in saving documents in different formats. You will also find out what type of file formats your computer supports.
Microsoft Word 1 - Save as a Works document
Create a new Microsoft Word Document and type your name in it.
Select the option from the menu. (Note that you could also click the icon of the disk on the toolbar to do this).
Name the document ‘change1.doc’.
Click the small down area beside the input box for ‘Save File as Type’.
Note the different formats available. The number of formats and the types will be dependent on the version of Word that you are using and the filters installed on your computer.
Find and select the file type .wps.
This will save the file as a Microsoft Works document. Note in the figure above how there are two entries for *.wps. These are both Microsoft Works documents but they are different versions.
Once you have saved the document, open Windows Explorer and navigate to where you saved the ‘change1’ document. If you have Microsoft Works installed on your computer, then the document will have the Works icon attached to it. If you do not have the program the icon will be a generic one.
If you now double click the icon it will open the document within Works (if you have it installed).
OR if Microsoft Works is not installed, you will be asked what application you would like to open the file with. See the figure at right. (The exact message and shape of the box may differ depending on your version of Windows.) Click the button as you need to install Microsoft Works on your computer if you want to open the file within that application.
Microsoft Word 2 – Save as a Text document
Within most applications you will generally have the option of saving a document as plain text. If the document is saved in this format, it will lose any formatting features that have been applied to it. However, saving documents as text can be very useful. Most application programs can open a text document. Therefore, if the application you use, (Word, Excel etc) cannot save in a format that is suitable for another application program that you want to use, you can at least save the text content and then open it in the other program and reapply the formatting.
Open the ‘change1.doc’ file you created in the previous activity.
Add some formatting to your name. (For example, make it bold and coloured.)
Select the , option from the menu.
Change the to ‘Plain Text *.txt.’ Leave the file name the same (change1) and click .
After you have saved it, use Windows Explorer and navigate to where you saved your document. Note that if you saved it in the same folder as the last exercise, you will have two files in the folder with the same name. This is allowable in this instance because the two files have different extensions.
Double click the text document. (Identify it by its icon). It should open your default text editor, (probably Windows Notepad) and also the document. Note that the formatting you applied within Word, (making your name bold etc), has been removed by saving as text.
Microsoft Excel – Save as a text document
When you save a spreadsheet document, you can easily save the spreadsheet into another application's format if Excel has a save filter for that particular application. For example, you can save an Excel document as a Lotus123 file, a Microsoft Works file or an earlier Excel version.
However, if the application type that you want to save to is not in the small down area beside the input box for ‘Save as Type’, then you can only save the file as a delimited text file. A delimited file is a pure text file that has an extra character, (a space, a comma, a tab etc) between the different entries in the file to distinguish each entry from the next. Once the file is saved in this format, there would generally be an import routine in the other application, to import a text delimited file.
Download the home_budget.xls (Excel document) file.
Save the file to your computer and open it with Microsoft Excel.
Select , .
Change the 'Files of Type' to ‘Text (Tab Delimited) (*.txt)’. Leave the same name (home_budget).
When saving the file you may get a warning message about formatting problems. Click OK (or yes) if this happens. This simply warns you that if you save as a text document you will lose some formatting features in the document.Use Windows Notepad and open the home_budget.txt file.
Note how the data is the same as the spreadsheet, with each cell and column entry delimited (separated) by extra spaces. The extra spaces are the tab entries, (the same as typing and pressing the TAB key on the keyboard).
Tip: This technique is very useful for importing/exporting data from very old versions of different databases. Most application programs can read delimited files, so once the text is imported, it is only a matter of reapplying the lost formatting.
Exercise 2
Try creating various documents in different application programs that are installed on your computer. Then save these documents in different formats. Try to reopen the document. If you can then you have the associated program installed on your computer. If not, then the associated program is not installed. Note that there is no formal answer to this exercise.
Exercise 3
Go to activity
File compression
When a file/document is saved on a computer, it is saved in a native format relative to the type of file it is. i.e. word, excel, text etc. However, by using certain compression programs, you can take a file, or a number of files, and reduce the size of those files or roll them up into one file. This can be useful when you want to transfer files between computers or across the Internet. Compression programs extract certain characters out of the contents of a file to reduce the size of the file. Unfortunately, once you extract the characters, you cannot open the document/file again, until you put the characters back in. There are various programs that can do this, but the industry standard at the moment is a program called WinZip®. (There are others that do just as good a job such as WinRar.) WinZip is a compression program that creates a file called an archive. Within this archive there can be one or more files. Many files that are available for download on the Internet are compressed. The reason for this is that they are smaller, allow quicker download and thereby reduce the amount of traffic on the Internet.
Archives created with WinZip have an extension of .zip. In Windows the default icon for an archive is the figure on the right.
Activity 3 – Using WinZip
Ensure that you have WinZip installed on your computer. If you need the program you can download it from http://www.winzip.com/ . Please note that WinZip is not freeware. If you intend to keep using the program, you are expected to pay for it.
Extracting files from an archive
There are various ways that you can add or extract files from an archive. This activity will walk you through the most common method.
Before you begin, download the zip_activity.zip (Zip file) file to your computer and store it in the My Documents folder. Note that the size of the zip file is approximately 3Kb (3000 bytes).
Open the WinZip program from the start menu.
A program screen similar to the image at right should appear.
Depending on the task, some icons will be greyed out.
Click the ‘Open’ icon and navigate to where you saved the zip_activity.zip file. (My Documents)
Select the .zip file and click open.
In this archive, there are two compressed files - a text Document and a Word Document.
Note the Microsoft Word Document. If you view the right of the Winzip Screen, you will notice that the original document size was 19968 bytes. The compressed size is just 1767 bytes.
To extract the files from the archive, click the ‘Extract’ icon. You will be prompted by a screen that asks you where you want to extract the files to. Ensure that the ‘Extract to’ input box shows the My Documents folder. You can either type in the location or use the ‘Folders/Drives’ box and navigate to where you want to extract them to.
Ensure that the ‘All files’ Radio box is selected. If you select a file/s within the archive window, the ‘Selected Files’ button will be activated and only those files selected will be extracted. (Note that there are some other options available in here). For our purposes we can leave these at the default. You should, however, read the Help files and explore the other options as well.
Click the button and the files will be extracted from the archive to the My Documents folder.
Check to see if the two documents are in the My Documents folder. To open them, simply double click on them.
Close the WinZip program.
Creating an archive
To Create an archive, open the WinZip Program.
Click the ‘New’ Icon.
You will be asked for a name for your archive. For this exercise, call it ‘My_Zip’. Type this into the ‘File Name’ box, ensure that the ‘Save In’ option shows the My Documents folders and click OK.
You will then be prompted to select the files that you want to add to your archive.
Navigate to the My Documents folder and select the two files extracted from the last exercise.


Tip: To select multiple files, hold down the key while clicking on the files. There are other options in here, including the ability to protect the archive with a Password. Please read the Help file for an explanation of the options.
Once the files are selected, click the ‘Add’ button. The archive will be created.
Close the WinZip program and check the contents of the My Documents folder for the zip file called My_zip.zip. In this archive will be the two files you selected in the activity.
Hints & tips for WinZip
There are various ways of using the WinZip program.
To open an existing archive, simply click on the archive from within Windows Explorer. This will start the WinZip program using the archived file.
To add files to an existing archive, simply drag and drop them onto the archive. If you have set a password on the archive, the added files are not password protected.
To extract files from an archive, you can drag and drop them from the archive into any folder.
If you double click on a file/document within an existing archive, the file will open with the associated program.
By default, WinZip adds a shortcut to the right click menu in Windows Explorer. If you select a file(s) and right click the mouse within Windows Explorer, you can create, add, or create and email a zip file.
Normally, to be able to extract files from an archive, a user must have a copy of WinZip on their computer. However, you can create an ‘executable’ archive. The files of an executable archive can be extracted in Windows, without WinZip.


WinZip also allows you to span an archive across multiple floppy disks, which is useful if you have an archive that is bigger than 1.44 MB. When you create an archive, specify that you want to save it on the A: drive (floppy disk) and an option to span disks becomes available.


Exercise 3
Practise adding/extracting files to/from archives using the following activity. Also, have a look at some of the options within the program and try to work out what they do. Tick each item as you complete each activity. You may need to read the help file and also the previous notes to complete some of the items.


Note, there is no answer to this exercise. Complete each task within the exercise and remember to use the Help file if needed.
File formats
Various types of file formats have been mentioned as you have been reading the previous notes and doing the activities and exercises. Here is a table that explains these types of file and graphic formats.
Graphics formats


File formats


Exercise
Go to activity
Produce required organisational documents
Data is imported/exported to produce required outcome.
Using the clipboard
Cutting and pasting data between applications
OLE – Object linking and embedding
Linked objects
Embedded objects
In the readings, activities and exercises in Topic 1, you explored different ways of exchanging data by creating files that can be saved and used on operating system platforms such as Windows, Unix, and Apple. You can also import and export some work in other ways if you are using the Windows operating system.
Using the clipboard
Data can be moved or copied between programs by using the Windows ‘clipboard’. The clipboard is a temporary storage area in the computer’s memory where data, such as text and images, can be stored for later retrieval. The Windows clipboard is accessed by using the cut/copy/paste commands available in the menu in all Windows applications.
Activity 1 – Copy and paste data via the clipboard

The above activity was a simple exercise in copying data from one application to another using the clipboard. You can also copy data from a spreadsheet to a word processor document and retain the table features of the data.
Activity 2 – Copy and paste a table between applications.


The exercise and activity completed above can also be completed in reverse - you can copy and paste a table from Word to Excel. When the data is pasted, the values in the table columns and rows are kept the same as in the cells within Excel.

Cutting and pasting data between applications
You can cut and paste data between applications, as well as copy and paste. However, ‘cutting’ will delete the data from the source document.

Note that the activities and exercise above can be completed using any Windows application. You can copy/cut/paste data between documents and programs using the clipboard. You could copy/cut an image from your favourite graphics program and paste it into Word or Excel for example, or you could cut/copy files from various folders by using Windows Explorer.

OLE (Object linking and embedding)
I felt there should be content under the OLE heading. This paragraph is more of an introduction to the concept so I’ve pasted it up.
You have probably copied data between various application programs such as Excel and Word. If the source data changes, then you may need to copy and paste the data again to the destination document to keep the information up to date and correct. Unfortunately, if you change the source data many times, the copy and paste tasks also need to be completed many times. To overcome this problem, Windows applications such as Excel and Word allow data to be pasted as an OLE object (linked and embedded).

Linked objects
When you paste an OLE object, the data is linked so that a change in the source data will automatically update the destination document with the changes. The only change in the copy and paste procedure is using an option to ‘Paste Special’ when pasting the data into the destination document and enabling the link between the documents.


Embedded objects
When an object such as a spreadsheet or chart is pasted into another program and the object is linked, the object becomes embedded within the destination document. This means that you can open the destination document, double click on the object and it will open the associated object in the source program.


Activity 5 – Embedding objects
Open the Rabbits.xls spreadsheet downloaded in the earlier exercises.
Select the area of the spreadsheet from A3:F15, the area that holds the rabbit data.
Use the techniques learned earlier to copy and paste the data into a new Word document. Ensure that you use ‘Paste Special’ and maintain a link between the two documents.
Once the data has been pasted into the Word document, save it as rabbit.doc on your hard drive.
Close both the rabbit spreadsheet and the Word document.
Now re-open the rabbit document. The rabbit table should be inside the document.

Double click the table in the Word document. This should open Excel and also open the Rabbits.xls spreadsheet. You could now make changes to the spreadsheet as required and the changes would be reflected back in the chart in the Word document.


This shows how an object can be linked and embedded within other program applications. The exact definition for OLE is having code from one program running inside another program.
Exercise 5
Download the home_budget.xls (Excel document) file.
Create a chart based on the surplus/deficit figures for the three months.
Export the chart to a Word document as a linked and embedded object.
Save your Word document (you can think of a name).
Close the spreadsheet and Word program.
Open the Word program and double click on the chart to open the Excel program.
If Excel doesn’t open, review the activities from this document to ensure that you can get OLE to work.


Produce required organisational documents
Data is saved and re-accessed without loss of data
Storage media
Using images in documents
Creating documents for use on web pages
If you need to refresh your memory of these procedures please click on this link: Appropriate packages and conversion techniques are used to achieve an integrated outcome.
Storage media
When data, files or documents are saved on your computer there are various storage media that can be used. Each of these storage media has different characteristics, benefits and drawbacks. The table below shows the characteristics of some of the more popular storage media.


Floppy disk


Portable and relatively cheap.
Most computers have the ability to read and save to a floppy disk.
Standard floppy disks have limited storage capacity – generally 1.44Mb, although there are some disks that can store 100Mb. Note that these require a special type of floppy disk drive.
Slow to access and read/save data.
High possibility of viral infection. High probability of losing stored data.


Hard disks


Generally not portable but you can purchase removable hard drives.
Not cheap, although the price of hard disk drives is continually falling.
Capable of storing large amounts of data - tens of Gigabytes (Gb).
Faster than other media for storage and retrieval of data.
Prone to virus infection. Low to moderate probability of losing the data stored on the medium.


CDs


Portable storage medium. Most computers sold these days have a CD-ROM (Compact Disk- Read Only Memory) capable of reading the CD disks.
Come in various formats.
Disks and the CD drives are relatively inexpensive.
Some CDs can be used many times for storage of data. These are Compact Disk re-writable (CD-RW) disks.
Some CDs can only be used once for storage of data but used many times for accessing the data. These were called recordable (CD-R) disks.
Hold a limited amount of data, generally 800Mb - not as much as hard disks but considerably more than floppy disks.
Popular in multimedia applications for storing music, video, and images. Low probability of losing stored data in the short term.

DVDs (Digital Video Disk)


Come in various formats.
Currently capable of storing 4.7Gb of data
Some DVDs used for Hollywood type movies are double layered. This allows the DVD to store the data twice.
Quality of output of DVD movies is more than twice the quality of standard VHS tapes.
Looks like a normal CD but a little more expensive as are the DVD reader/writers, although this may soon change.
High speed access but not as quick as a hard disk drive.
DVD medium is portable but your computer needs a DVD reader to access the data.
Extremely popular for multimedia applications. Movies and sophisticated presentations can be created on a computer and played on a standard DVD desk top player on your television.
Will last a long time, as there is no contact between the disk heads and the actual medium. Low probability of losing stored data in the short term


USB drives


A newer popular type of portable storage media.
Currently capable of storing up to 2Gb.
Reasonably expensive, although this may soon change.
Small and light. Can be carried in your pocket or on your keychain.
Reasonably fast access.
Computers need a USB port to access the drive, so they cannot be used on earlier computers without installing a USB peripheral card. Low to medium probability of losing stored data in the short term.


Using images in documents


The popularity of computers, scanners and digital cameras has given the average business and home user the possibility of producing eye-catching documents. The use of carefully placed images in documents can help a reader understand a concept or attract their eye to a particular part of a document. For example, when you started reading this section, the first thing that you probably would have noticed was the image on the right.


Images can be obtained from various sources. Images may be:
scanned in using a digital scanner
downloaded from a digital camera
purchased on CD from various vendors
downloaded from the Internet from sites that offer free images drawn in various drawing programs on a computer.


Whatever source you obtain your images from, consider the following points when using the image within documents.
Some documents only support limited types of images. For example a web document (displayed in a web browser) only supports a .jpeg, .gif or .png image. Early browsers do not support the .png image type.
Some applications will only save images as a certain type. Early versions of Windows Paint, would only save as a bitmap (.bmp), for example.
The size of the image can vary considerably depending on how the image has been saved. Placement of the image within the document needs to be carefully considered and also how the text can flow with the image. Ask yourself if text should flow around the image, or stay only on the left or right of the image.


Activity 1 - Comparing image files
The two images below are exactly the same image created in the Windows XP version of Paint. The XP version of Paint has the ability to save your drawing masterpieces in a format other than a bitmap. The difference in quality between the two is not significant (unless you load them into an image viewer and zoom in on each image), but notice the size of each image and the number of colours. Although only small, the size of the .gif file is around 60-70% larger


This is a 256 colour .gif image of approximately 14k.


This is a 16.7 million colour .jpeg image of approximately 9k.


Activity 2 - Inserting images into a word document In the following activity you will insert an image created in another application into a word processed document and manipulate placement of the image within Microsoft Word.


Right click on each smiley image above and save them to your hard disk. Do not change the name and file type.
Download the image_exercise.doc (word document) and save it on your hard disk.
Once you have downloaded the document, open it in Microsoft Word.
The document has some information in it and also two tables. The tables will be used to place the graphics within the document.
The second table also has some text in it so we can place the image amongst text to practice wrapping text around images and also resizing the images. (The text in the second box is actually two verses of our National Anthem!).
Click behind the text ‘The gif image will be placed behind here’. This text is in the first table. See the image on the right.


Select the menu and then select .
Navigate to where you saved the two smiley face images. Select the Smiley_gif.gif image and click the button.


The gif image will be inserted into the first table.
Click on the image. The ‘handles’ (small boxes) will be placed around the image. Note that there is a small problem in that the text is pushed to the left and top and bottom of the document. It needs to be tidied up.


Move the mouse cursor over the bottom right handle of the image. The shape of the cursor will change to an angled, two headed arrow.
Once you have this shape, click and hold the left mouse button and drag up. This will allow you to resize and reduce the image.
Reduce it down to around 50% of its original size.
Click on the smiley image and hold down the left mouse button. You can now move the image left or right within the table. Drag the image across to the right of the existing text and let the mouse button go. The image will be placed at the end of the text.


In the above activity you learnt how to insert an image into your document and move it around the table to make placing the text easy. In the next part of the activity, you will learn how to place the image among existing text, and to get text to flow around the image.


Ensure that the image_exercise.doc is open and click behind the red text in the second table.
Select the menu and then select .
Navigate to where you saved the two smiley face images.
Select the Smiley_jpeg.jpg image and click the button.
This will place the image in the table. Because of the size of the image, the document will probably now extend over two pages.
Use the techniques you learned in the previous activity and resize the image to a more manageable size, so the table and the image fit on one page.


Delete the red text in the second table. The image will move to the left, although there is still a gap between the first and second verse of the anthem. It would be better if the text flowed around the image, as shown in the graphic on the right. To do this we need to format the picture within Microsoft Word.


Double click the image.
This will open the ‘Format Picture’ dialog box. Select the Layout tab. This shows the various layouts the text can form around the image.


Click the button at the bottom of the layout box.
Ensure the ‘Text Wrapping’ tab is selected and click the picture named ‘Square’. This setting will allow you to move the image anywhere around your document without affecting the text.
The images in this area show you how your text will flow around the image once selected.
Click the button twice.
You will notice that the handles (the small black boxes) around the image have changed to circles.
You can now drag the image around the table amongst the text.
When you place the image, the text will flow around it.
Place the image in the top right of the table and notice how the text flows to the edge and underneath.
Practice moving the image around the table and placing it in various positions.


Hints:
The activities above can be done with any type of image that can be imported into a word processed document. We could have completed the second exercise using the bitmap file or the jpeg.
The Microsoft Office program includes a set of images in the .wmf (Windows Metafile Format) format that can be used within your Word or Excel documents.
When you are creating your images, ensure that the size of the files are not too large. When saving your documents it may make the files too large and they cannot be saved on floppy disks or used on web sites.

Exercise 2
Create an image using Windows Paint (Simply draw a picture - any picture).
Try not to put too much in the picture because the file size may get too large.
Save the image on your hard disk as a bitmap. If possible, use the option to save as a 24 bit colour bitmap to keep to a smaller size. This will depend on your version of Windows.
Use the techniques learned above and import the image into a new Word document.
Type some text in your document and manipulate the image so that the text flows around it.
As additional exercises do the following.


Determine and use help
Help is accessed through online help and manuals
Using Help
Context sensitive help
Using the question mark icon
Using the built in help system
Searching Help
Using the Office Assistant
Using many computer application programs these days can lead to sheer frustration in trying to do even the simplest of tasks. There are many ways of working out how to complete a task. You could ask a friend, buy a textbook, search the internet or use the Help facilities built into the program.
These notes will concentrate on using the help facilities within the Microsoft Word program, although the concepts, tasks and ideas can be applied to just about any program available on a computer.
Using Help
Within Microsoft Word (and other application programs) there are different types of help:
context sensitive help
help where you can search for information on a particular subject
the (some say dreaded) Office Assistant.
Back to Produce required organisational documents
Context sensitive help
Most Windows programs provide the ability to get help on a particular part of the screen, function or task by accessing a facility called context sensitive help. In Microsoft Word (and most Windows programs) help can be accessed from the Help menu or by using a combination of keyboard keys.


Activity 1 - Use context sensitive help


Open the Microsoft Word program and create a new document. Select the menu and then select the option.


The shape of the pointer will change to a left pointing arrow with a question mark attached to it. The cursor will stay this shape until you click on something in the current window.


Move the mouse pointer over the icon of the floppy disk on the toolbar menu.
Click the left mouse button.
Information on that particular item will appear in a balloon box on the screen.
If you want help on another item, select the menu option again or hold down the + keys at the same time.


On some items, there may be no information available on the item you select. In this case the help system will inform you that: ‘There is no help available for this subject’.


Exercise 1Use context sensitive help and click on different items in the Windows screen and get help on those items. For example, while in context sensitive help click the printer icon, the ABC icon etc.


Using the question mark icon
In some dialog screens, you may notice an icon of a question mark in the right hand top corner of the dialog box. This can also be used for context sensitive help on the dialog box currently showing.


Activity 2


While in Microsoft Word, click and .
This will open the ‘Save As’ dialog box.
In the top right of the dialog box, you will notice an icon of a question mark.
Move the cursor over the question mark and click the left mouse button.
The cursor will change shape to the context sensitive help pointer.
Move it over an item in the ‘Save As’ dialog box and click on it.


Help on the item will be displayed or you will get a message that no help topic is associated with the item.


Using the built in help system
Microsoft Word, like most programs, has built in help systems. You can access these systems by clicking on the menu item, pressing the key or clicking the icon on the toolbar that shows a question mark within a yellow box.
Help can then be accessed by clicking on different items within Help or searching for specific data.


Activity 3 – Using general help
Note: For this part of the activities it is important that the Office Assistant is not active. To ensure this, please complete the following steps.
Click the menu.
Select . This will cause the office assistant to appear.
Right click on the Office Assistant and select .
Select the tab and remove the tick from the ‘Use the Office Assistant’ option.
The Office Assistant will close and the following activities will work correctly.


Ensure that Microsoft Word is open with an empty document.
Press the key on the keyboard. This will open the help system. Note that the help system is a separate process in later office applications. It will run a new application called the Microsoft Word Help Program.


Click the tab.
The contents section allows you to navigate through the help system.
To expand the help contents, click the small plus sign beside ‘Microsoft Word Help’.
Notice beside each of the small icons of books, there are plus signs. Clicking on any of these plus signs will expand more help on that subject.


Note that the wording and location of help between versions of Office differs. Below is one example that shows what happens when some of the items are expanded to navigate down to help on OLE (Object linking and embedding) within Word.


As an activity, determine where help on OLE is within your help system. It may be the same as the image above or the wording and location could be a little different.


Searching Help
You need to know where to find help in the contents list to be able to get information.
However, a better option is to use the search system within help.


Activity 4 – Searching for Help
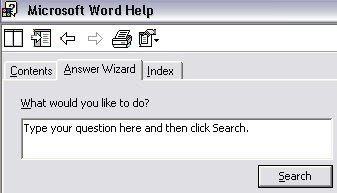


Ensure that Microsoft Word Help is open.
Click the ‘Answer Wizard’ tab. Note: on some Help systems this may be called ‘Search’. There is an input box in which you type the text that you would like to search for in the help system.


For the exercise, we will do a search on OLE objects.
If not already selected, click the text in the input box.
Type in OLE.
Click the button. The bottom area will then display a list of topics within Help that relates to our search criteria, OLE.


If you click on a topic, the right side of the Help screen will display information about the topic.


In some Help screens you will notice that the information includes hyperlinks to more information.
A hyperlink is simply a navigation link between this part of Help and another part of Help. If you click on the link it will display more help related to the search topic.


Exercise 3
For this exercise, search for any help items that you may have had trouble with when using Word.
If you can’t think of any, try searching on items such as:
importing
exporting
integration. Note there is no answer for this exercise because of the differences between help systems.


Using the Office Assistant
The Office Assistant is a help feature integrated into recent versions of Microsoft Office. The Office Assistant is another way to access Help by typing in your query and searching the help system. Many computer users do not like the intrusive nature of the Office Assistant and it is regularly disabled.


Activity 5 – Using the Office Assistant


Because we deactivated the Assistant in the previous activity, we need to turn this feature back on. Click the menu and select the option .


An animated image of the Office Assistant will appear somewhere on your desktop. The character may also be different to the one shown at right as they can be changed.


Click the Office Assistant animation with the left mouse button. A balloon box will appear into which you can type your help query.


For the exercise, type OLE in the search box.
Another balloon will appear with topics from the help system about OLE items.
Select a topic that interests you and you will be hyperlinked to that topic within the normal help system.Note that Office Assistant remains active and allows you to select different topics or do another search for other help items.

Determine and use help
Internal organisation client documentation is obtained and used
Mail Merge documents
Importing data into a table in a database
The Mail Merge wizard
Commercial computing packages also include programs for the storage of data to produce documents such as customer lists, price lists, overdue accounts and so on. These storage programs are called databases. A database program has two parts. First there is the actual data that is stored in tables and second there is the database management system that is used to control access to and retrieval of data from the tables.
Mail Merge documents
The data that is stored in the tables can include basically anything that could be stored on paper lists, forms or cards. Because it is stored in electronic format, you can use tools in programs such as Microsoft Word, Access or Excel to extract the data and create other documents for use within the organisation.
One such procedure is to produce Word documents called Mail Merge letters. For example if you had table(s) in a database that contained information on your customers such as their name, address, and personal information you could use this information to send out a letter informing them of brand new product that you wish to advertise.
If you have the data already stored in your database, then you can simply use tools (within Excel and Word) to extract the required data, (name, address etc) and print the data (customer details) once on the top of a generic letter.
Remember, (for the exercise) that a database consists of tables. A table consists of different entries and is also sometimes called a file.
Within each table are fields which may contain information such as a person’s name, address, date of birth etc. Each form is a record of the person’s application and when you put all the forms together you have a file of member applications.


The image above shows a table from a database.
The table is a file of customers. The information could be written down on a customer card file.
Each row represents a record on customers or the individual cards.
Each record is broken into individual fields - ID, CustomerID, First Name etc.
For each customer there must be exactly the same mount of fields, although the data in the fields can be the same or different.

Importing data into a table in a database
Activity 1 - Importing data into a database table
First a database needs some valid records in it.
Download the Customers.txt (Text document) file and store it in your My Documents folder.
This text file is a delimited file that holds basic information on six customers. (Remember that a delimited file is a text file that holds data that is separated by a particular character.)
You will use this text file to create a table in Microsoft Access that you can use in a Mail Merge letter.
Please note that these notes, activities and screen shots refer to using Office XP. However the concepts are the same for all versions of Microsoft Office.
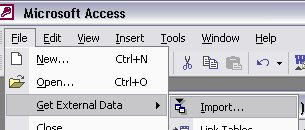

Open your Microsoft Access program and create a new empty database. Click , and .


Navigate to where you saved the customer.txt file in My Documents.
Change the ‘Files of type’ option to display *.txt files. Select the customer.txt file and click .


Your Access program should start to run an ‘Import Wizard’.
The wizard will recognize that this is a text file and ask if it is a delimited or fixed width file.
Notice how each entry in the Sample data box has quotes around it and there are commas between some of the words.
When the data is imported, the entry will be stored in a separate field in the table, wherever there is a comma. Accept all the defaults in here and click .


The next screen gives you the option to change the delimiter character from something other than a comma.
Make sure you pick the right delimiter character otherwise the data that is imported will be placed incorrectly into the table and the records will be invalid. For the exercise, leave the delimiter character as the comma.


The other important item in this screen is the tick box for ‘First Row Contains Field Names’.
Ensure that this option is selected. This tells the wizard that the very first row of information in the text document is used to identify the fields in the table. Click the button.
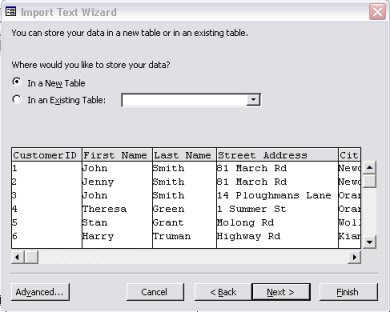

The next screen gives you the option to import the data into an existing table or create a new table.
For the exercise you will create a new table. Leave all the options as they are and click .


The next screen gives you an option to change the way your data is imported into the table.
You could change the names of the fields or specify different formats for dates etc. If the data you were importing was stored in the American date format (MM/DD/YY), you could change this to display the Australian date format (DD/MM/YY). For the exercise, leave all options as they are and click .


The next screen asks how to specify a ‘primary key’. A primary key is used to uniquely identify each person in the table. For example, each person in Australia has a unique Tax File Number that identifies that person. The primary key in the table uniquely identifies that customer. For the purposes of the exercise leave all the options as they are and click .


The last screen simply asks for a name for your table.
Leave it as the default of ‘Customer’ and click .
This will import the data into Microsoft Access, create a new table called ‘Customers’ and populate the table with data from the text file.
You can now use this data for your Mail Merge. Save your database as ‘Customers’.

The Mail Merge wizard
Activity 2 – Doing a Mail Merge
You can now import the data into a generic letter that could be sent to customers.
Again these instructions are for Office XP, but the same concepts can be applied to any version of Microsoft Office.
Download the Merge_letter.doc (Word document) and save it on your hard drive.
This is a sample document that a company could use to send to their customers about the opening of a new computer store.
Open the merge_letter.doc.
In Microsoft Word, select , and .
This will start the Mail Merge wizard.

The screen will split into two sections - one showing the document and the other showing the wizard steps.


The first question in the wizard is what type of document you are creating. Leave this at the default of letters.
Notice also the option to continue to the next step at the bottom of the wizard screen.
Click ‘Next: Starting Document’. This will move on to the next step.


You will now be asked for the document to use for the Mail Merge. You can use the current document, load a new document or use a template document.
For the exercise, leave it at ‘Use the current document’. Click the next step ‘Select Recipients’.


The next step asks for a list of the recipients to include in your mail merge.
You can use an existing list from a database, text document or spreadsheet, or create your own list.
For the purposes of this exercise, you want to use the list (table), in the customer database.
Note that you could also click ‘Browse’ here and navigate to the database. to perform the same operation as the next step. Leave the default option to ‘Use an existing list’ and click the next step ‘Write your letter’.


The ‘Select Data Source’ navigation box will appear asking you to select the data source.
Navigate to where you saved your customer database and click .
The ‘Mail Merge Recipients’ dialog box will appear. As the customer table is the only table in your database, it opens that table. Each record that has a tick beside it will be included and a letter will be generated for each customer.

To exclude a customer from the list, remove the tick beside their record.
You could also sort the tables into different order. For example, if you wanted the letters printed in town order for delivery purposes, you could sort them by clicking the ‘City’ identifier. If you click the City identifier again, the table is sorted into reverse order.
Click the button to close the Mail Merge Recipients box. Select the next step ‘Write your letter’.


As the letter is already written, you do not need to add anything. However, you do need to place the fields that you have imported on the letter in their correct positions. This is the procedure ‘add recipient information’.


Click in the document at the top and to the left, just below the graphic. This is where you will place the first field. It is easier to click where you want the fields to be placed before placing them, but they can be moved after if required.

Select the ‘More Items’ hyperlink from the wizard.


This will open the ‘Insert Merge Field’ dialog box.
This dialog box shows the fields from the database table that can be inserted into the document. For the exercise, you do not need all the fields shown in here.


Click on the first field, ‘First Name’, and click the button.
The field is placed into the document.
Repeat the previous two steps for each of the remaining fields for the merge document - ’Last Name’, ‘Street’, ‘Address’, ‘City’ and ‘Postcode’. This will place them all in one line (which you will fix in a moment). See the graphic below.

To tidy the layout of the document, click between each of the fields and either press the or the key so the fields look like the graphic at right.


There is one more task to complete in this section.
Use the technique just learned and insert the ‘First Name’ field after the word ‘Dear’.
There is now enough information in the letter to continue. However you could continue to add fields to the letter if necessary. Select the next step ‘Preview the Letter’.


This step will show how the first of your merge letters will look.
If the layout is not to your liking, select the previous step and adjust the letter.
Note that you also have the option to display a particular recipient’s details or to modify the list.
Also, the documents will not print with the grey backgrounds around the field names. Select the next step: ‘Complete the merge’.


In the last step you have the option to print all the documents or edit each document.
For the exercise, don’t send them to the printer. Click the hyperlink to ‘Edit individual letters’.


The ‘Merge to New Document’ box appears. This box allows you to create a new document with separate pages for each recipient, create a new document for the current recipient or pick a range of recipients.
For this exercise, leave the ‘All’ option selected and click .
This should generate a new document called ‘Letters1’.
The document should contain 6 separate pages, one for each recipient. Note that the content of each letter is the same, but the names and addresses have been inserted from the records in your database.

Exercise 1
in this exercise you create documents for medical histories kept on dogs at a Vet clinic. The dogs’ information is to be kept in an Access database. You will import the dog information from:
a text file to a table in Microsoft Access
the database table to a Word document.
You will also create an image to place on the top of the document. An example of a finished document is supplied.
Download the dogs.txt (Text document) file and save it on your hard drive.
Download the dog_history.doc (Word document) file and save it on your hard disk.
Download the finished.doc (Word document) file and save it on your hard disk.
Import the dogs.txt file into Microsoft Access as a table called ‘Dogs’. Note that the first row contains field identifiers. Save your database as ‘Dogs’ too.
Create an image using Windows Paint that could be used as a document header image for the Vet surgery.
Save the image as a bitmap or as a jpeg file if you have the option.
Open the Word document called dog_history.doc (downloaded earlier) and replace the first piece of red text with the image you created in the previous step.
Insert the fields from the dog table into the Word document. Create a merge document for each of the dogs in the table.

This completes the reading, exercises and activities for this topic. If you are unsure about any of the concepts covered in these notes, please review the readings and complete the exercise and activities again. This should help you to understand how you can integrate the data and information from commercial computing packages.
I would delete this paragraph as it doesn’t add any new information.

Glossary

Application

Another term for a computer program such as a word processor, spreadsheet, database, program utility etc.

Microsoft Windows

An operating system for your computer that controls resources such as file management, input and output, printing etc.

File extension

A group of characters that an application will attach to a file to identify it to the operating system. Examples are .doc for Word documents, .xls for Excel documents.

Table

A data structure used in databases to hold information in a complete entity such as customers, employees, spare parts, goods in stock etc.

Field

The individual elements that make up a database record. For example, a customer record would hold individual elements on the customer name, address, city and postcode.

Record

The individual items that make up a database table. Each customer would have a record in a customer table. The individual fields are combined to make a record.

Primary key

A field in a database that uniquely identifies each record. For example, the Australian government keeps a record of each person in their tax file system. Each person is identified by a tax file number. This could be used as a primary key in a database table.

File

This word is often used to describe a document.

Clipboard

A temporary storage area of a computer’s memory to keep information for importing and exporting within documents and programs.

Filter

An add-on feature to a computer program that can perform special functions such as allowing data to be imported/exported into another program. One example would be the filter that allows a Lotus123 spreadsheet file to be opened in Microsoft Excel.

Embedded object

An object such as a chart, spreadsheet or document, that when placed in another type of application is embedded and linked.

HTML

Hypertext mark-up language. The program code used in web pages to display text, images, colours, sound, video etc.

Lotus123®

An alternative spreadsheet program to Microsoft Excel..

Compressed file

A file where a special algorithm is used to extract certain data from within the file to make it smaller. When it is smaller it can be transferred more easily using floppy disks, CDs or even email. The file needs to be filled again before it can be used.

Thursday, November 8, 2007

ICAITU012C Design Organisational Documents using Commercial Computing Packages

ICAITU012C
Design Organisational Documents using Commercial Computing Packages

Outcomes - What you will learn from this unit
Templates - Why are templates used?
Word Processing - Word processed templates with examples and practical tasks for you to do.

Exercise 1 - Short answer, multiple choice and true or false questions
Exercise 2 - Multiple choice questions

Spreadsheet template - Spreadsheet templates with examples, a practical task for you to do and some helpful tips
Creating a useful Help File - This is a practical task where you will learn how to create a useful help file
Creating a form - This is a practical task where you will learn how to create a form

Exercise 3 - Short answer questions

Sample Work Placement Project - Practical tasks that could complete at your work placement

Glossary- Explanation of terms that will help you with this unit

Other resources - Useful links

Outcomes
On completion of this unit learners should be competent in creating documents and templates that meet client requirements.They should have the ability to:
1. select the appropriate software
2. manage document design to reflect the needs of the client
3. provide support mechanisms for the client to use the documents effectively
4. store the documents in a form and location suitable for the client to use effectively.

Glossary

ASCII
American Standard Code for Information Interchange is the most common format for text files in computers and on the Internet

Bookmark
A bookmark is an item or location in a document that you identify and name for future reference

Desktop publishing
A software application used to combine graphics and text objects to produce high quality publications

Document
A file that is usually printed off. It may consist of many pages

Document status
Where in the creation, use and updating of the document the information is up to

Expiry date
The date by which a document is no longer accurate or viable

Fault log
A listing of faults and remedies in a system to allow trends to be seen and rectified

Footer
A section at the bottom of a page that has consistent information that is the same on each printed page

Form
A document created to provide a layout that a user can use to enter the required information

Header
A section at the top of a page that has consistent information that is the same on each printed page

Help file
Usually an online document that is designed to give the user assistance in using an application

html
Hypertext Markup Language

Hyperlink
Connection from a word, section of text, picture, or information object to another

Inventory
A data store of items

Letterhead
A pre-printed shell used to identify commercial documents. It usually has the organisation details and a logo. It may have a watermark to make unauthorised copying more difficult.

Meeting agenda
A list of the topics to be discussed at a future meeting

Meeting minutes
A document containing the results of discussions at a meeting. It is used to ensure that decisions and actions are recorded to avoid confusion.

OCR
Optical character recognition is the recognition of printed or written text characters by a computer

Print preview
Allows a developer to ascertain if a hard copy will print correctly

RSI
Repetitive Strain Injury is caused by long sessions involving the same physical movement

Scanner
A scanner captures images from photographic prints, posters, magazine pages, and similar sources for computer editing and display

Style guide
A document created to identify the spelling, layout and common grammatical issues within an organisation

Target
The destination of a link

Target audience
The intended viewers or users of the file(s) or the people intended to actually enter data when using the documents

Template
A document that has some of the consistent elements already created such as headings, logo

User
A person who employs components of the system to complete a task

Version Control
A method used to ensure that the correct version of the document goes to the specific audience

Wizard
A facility included in many commercial software applications which allows complex tasks to be automated for inexperienced users or to save time for “experts”

YSIWYGW
What you see is what you get. The printout is the same as the screen display

Other resources

The Microsoft Office Home Page Selecting this link will take you to an external site. .You can find tutorials on applications and design principles at this site.

Whatis.com Selecting this link will take you to an external site.You can find more definitions and quizzes on this site.

Templates

Templates and a consistent document format ensure that commercial documentation maintains a coherent look and “feel” across an organisation. The use of consistent information (e.g. organisation details, phone numbers etc) ensures accuracy across documents.

Templates also ensure that objects that are applied to a number of documents (eg an organisation logo) can be stored in the one file location and dynamically linked within an organisation’s network. This has many advantages. All documents have the same look and feel and if information needs to be updated, such as a new fax number, logo or email address, the new information needs to be updated only once.

Microsoft Office has several examples of templates. In MS Word there are templates for minutes, memos, faxes and resumes and other publications. These documents have a .dot extension. In MS Excel there are templates for invoices and finance related templates. These have a .xlt extension. Familiarise yourself with these standard templates.

Exercise 1
Questions 1 to 5 are short answer questions.
1. A template is available for most applications when you store them in a Templates Directory. What is the location of this directory on the computer you are using now?

To find where your template files are stored, use the find facility to look for *.dot files.

2. Describe some of the common tasks that are performed when creating a new template.
- setting up headers and footers
- adding a logo
- placing commercial information to create a letterhead
- setting the default font and styles* setting page margins.

3. Touch typing is a useful data entry skill.
What is touch typing?

Touch-typing is the skill of knowing where all of the keys are on a standard keyboard layout and using specific finger movements to most efficiently activate the appropriate key. It relies on having a standardised key layout and the concept of “home keys”.

4. What course of action should you take to prevent RSI?

RSI or Repetitive Strain Injury is caused by long sessions of the same movement as in the action of touch-typing. Regular rest breaks and ensuring that the fingers are moved through their full range of movement is a good method of avoiding this type of injury.

5. What does “confidential” mean when used in connection with commercial documentation?

“Confidential” refers to the fact that some documents are not intended for general distribution and may be protected to ensure that only the specified recipients are able to view the contents when online or via emails. In the past, hard copy documents could be kept locked away from public access. With the advent of networks and electronic storage the concept of confidentiality is more difficult to enforce.

6. Choose from the options below.
WYSIWYG means:
1. what you see is what you get
2. the file is displayed on the screen as it is to be printed
3. the web layout of a printed page.

What you see is what you get. The acronym is a leftover from the first computer programs when they often showed only the code and the hard copy would display the actual code actions. This is similar to modern HTML where hello would display in a web browser as hello.

Answer True or False to the following questions.

7. A data entry person who uses a template to create a document should then save the file to the document template directory.
TRUE / FALSE

Answer
FALSE. If the files have been created from a template that is opened from the templates directory then the user is given the default option of saving the file as a document that they can name. If the template has been saved in other directories then they may have to use the Save As option.

8. A scanner can only digitise photographic images.
TRUE / FALSE

Answer
FALSE. Scanners are merely a device designed to digitise black and white areas or coloured areas of a scanned document. Graphics programs and Optical Character Recognition programs allow the digitised information to be manipulated correctly.

9. Each page of a printout is a separate file.
TRUE / FALSE

Answer
FALSE. This is a common mistake of new users of word processing software, especially where different topics are covered in the one document. Word processors are able to delineate page spaces effectively to create multi page documents.

10. There is an automatic facility to include page numbers in a document.
TRUE / FALSE

Answer
TRUE. There are a number of scripted modules that allow text that is commonly used in documents to be included in the files using the appropriate metadata to update automatically (eg date, time printed page number).

Exercise 2
Multiple choice

1. Desk Top Publishing is:

1. a device used to create high quality printouts by ensuring that the paper size is accurately accounted for
2. a software application used to combine graphics and text objects to produce high quality publications
3. an organisation listing where the output to be printed on large printing presses using lead typeface
4. a type of commercial enterprise where they specialise in coffee table books of a high quality.

2. The Print Preview:

1. will appear different if an alternative printer is selected for the print job
2. allows a developer to ascertain if a hard copy will print correctly
3. allows a developer to ensure that all words are spelt correctly
4. ensures that the document will be readable when printed on orange paper.

3. A form is:

1. only available as a printed document
2. only available when using a database application
3. a document used to gather data from an audience
4. a document designed to lead a user in entering data to ensure consistency and accuracy of information.

4. Which of the following is a health hazard?

1. laser printer toner powder
2. ink jet printer ink
3. paper dust
4. All of the above.

5. Expiry date is:

1. the date by which a document needs to be removed from circulation
2. the date by which a project is to be completed
3. what happens when the manager finds out you didn’t put the ad in the Yellow Pages
4. the date by which a document is no longer accurate or viable.
Exercise 2
Answer Multiple choice
1.B
2.B
3.D
4.D
5.D
Word Processing

To ensure that documents belonging to an organisation are consistent and include correct, relevant information (logo, contact details and text styles) we create a letterhead and style sheet. This ensures that the information will be placed correctly and appropriately in the document.

To create text documents on a computer we use a word processor rather than a text editor. A text editor stores the ASCII characters in a data table of character position and ASCII value. A word processor has a similar basic function, however each character has large amounts of metadata held in the array as well.

Touch typing is a good skill to possess – use a typing tutor program to practise such as TypeQuick or Typing Tutor. Touch-typing allows for the quick entry of original text data. If hard copy exists then scanning and OCR is often an appropriate method. Speech to text recognition software, such as Dragon NaturallySpeaking or Point and Speak Voice Recognition, can speed up the process of text entry for slow typists.Word Processing Documents

As most documents created in a word processor are meant to be viewed as hard copy (printed on paper) the basic word processing applications tend to be WYSIWYG. Use the Print Layout option on the View menu to see how the document will looked in printed format as you are creating it. This is important if you are drawing objects such as a flowchart.

Tip If you need to change the settings of the various document sections use the File - Page Set-up Menu.Document Templates

To allow for quick development of complex documents and to keep uniformity within the commercial environment, templates are often created. You will need to create your own template to use as a basis for the rest of the task.

Task 1
For this task you are going to create a letterhead for your school/college and store it as a template. Here is an example of a letterhead. Look at the sample letterhead before you attempt to create your own.

Example of a letterhead

Instructions
- Use the Find facility to locate the document templates (*.dot) used by MS Office. Note the location.
- Open MS Word.
- File – New Create New – Template
- File - Page Set-up: paper size, margins, different first page, orientation
- Format – Font: font set, size, style
- View - Header and Footer: School (or your) name, subject, year
Tip --Most of the items below will be found on the Tool Bar or in the Insert Menu.

- Footer: auto-text filename, page number, dateNB--use the tab key to move the cursor in your footer.
- Save.
Styles

Create a new Heading Style using a different Font (eg Paddington), size, spacing character formatting (bold or italics).

Use Styles (your style) to format the Headings

Use a 1.5 pt rule line to create the underline

Save your work to a floppy disk regularly – it can save a lot of stress if something goes wrong.

Task 2
Create more templates

Now that you have created a template, create a series of templates suitable for the Work Placement organisation you have worked with or another organisation that you are familiar with. Once a number of suitable items are created, look for consistent objects and link them to a single data source (e.g. logo, header, etc)

NB You will need to create the logo and then insert it as an object that islinked.

You will need to draft a “rough” sketch by hand for each before you create the documents. Remember to develop a consistent “feel” for the set of documents that your Work Placement organisation or other organisation would use.

Examples of suitable documents could be:

* intra-office memo
* official correspondence
* office newsletter
* fax cover sheet
* monthly report
* section report
* entry on duty data sheet
* accident report form
* order form
* purchase request form

Here are some examples of organisational documents.
These samples will help you create your own documents.

* Inventory sheet
* Memo sheet
* Minutes sheet

Task 3
List some of the documents you have used
while at YOUR Work Placement(s).

Exercise 3

1. What are some of the ways Help files aid new users unfamiliar with a software procedure?

- the ability to find out how to perform a specific task
- to research how a task could be managed more efficiently
- to solve a specific problem encountered while using the software.

2. Compare and contrast the two types of Help files available, namely printed booklets and online resources.

- Both types allow a user to find out how to solve problems with software applications or hardware devices.- Both are able to be referenced by using an index and a contents page.
- Both are organised into passages that deal with related problems.
- Online files are able to be searched for keywords efficiently.
- Online resources are able to have wizards and macros attached to allow a user to see a procedure in a step by step fashion.
- Paper based resources are able to be accessed even when the computer has frozen.
- Paper based resources are able to be read anywhere, e.g. on public transport whereas online resources require access to computers and a network.

3. How would the language used differ for the different audiences you may have to deal with?

An experienced user will generally be looking for very specific information and will be able to comprehend technical terminology. New or inexperienced users will require simpler sets of instructions using less technical language. They would probably benefit from the more time consuming development of wizards and “how to” animations.

4. Define the term hyperlink.

A word, section of text, image or information object which has a connection to another.

5. What is a “target” when referring to links?

A “target” when referring to links is the destination of the link

6. Define the term “bookmark” in reference to linking.

A bookmark is an item or location in a document that you identify and name for future reference.

7. Why are bookmarks often used in templates and documents?

Book marks are used to automate data entry and to find information in documents. They are also used in table of contents and indexes.

8. Briefly describe the process of creating a bookmark in Microsoft Word.

Select the item you want to bookmark. On the Insert menu select Bookmark. Give your bookmark a name. Click Add.

9. Describe the process of saving a word processed document as a web document.

From the File menu select the Save as Web page option and give your document a name. The file is saved as .html.

10. Why do organisations often save their documents in both word processed format and web format?

To be able to publish documents on a network and on a intranet/internet.
Creating a Useful Help File
Target Audience

When creating documents it is important to target the document to the people you expect to actually read it and use it. Your Help file needs to have the language and concepts matched to the people who are most likely going to be using your document.

Shown below is a screen from the initial Help function in Windows 2000 Help Screenshot


The screen below is for a process in Microsoft Access that is something a person familiar with Access may want to do. The styles are different, as is the language used. Technical terms are used.


Microsoft Access help screenshot

You will need to create a word processed file accessible from all of your documents which will enable new users to know how YOU expect them to be able to use your templates. They may do it differently in the end – you are just giving expert advice!

You will need to create a link from your documents to this help file.

Remember to continue to develop a consistent “feel” for the set of documents that your Work Placement organisation or another organisation would use.

Examples of suitable topics could be:

* opening a template

* creating a default directory in which to save files

* changing the password on the spreadsheet

* moving data from the forms to the database

* storing the templates in the correct location for them to use the File – New command


Most importantly – get someone else to test the Help file to ensure that it makes sense.What your help file will need

* Use the table of contents function to create hyperlinks to the main Headings.

* Create a button on the toolbar to allow a user to select the “find function”.

* Use any other facilities to make the file more usable.


Tips on creating a help file

Creating a form

Automated forms are widely used for data entry. The forms are designed so that the cursor moves to the next data entry point automatically. This saves time and there is less chance of entering incorrect data.

When a survey is being conducted the data is usually saved in a database. It is extremely important that the client fills in the details in the appropriate manner with complete accuracy.

Automated forms can be created to allow people to enter data into an online form and then: -

* print the completed form

* upload the completed form

* output the data ONLY to a text file ready to import into another application (eg database or spreadsheet)

Create a form

Follow the steps below to create a form that will allow you to capture the data from students about: -

* the type of computer they own and/or use and

* their travel arrangements to school/college

Procedure

* Create a new template from a blank document.

* Create a title for your form.

* Create four blank lines.

* Insert a table into the second line (i.e. leave 1 blank linebetween your title and the table).


* Enter the following data into the table.Type of computer you own or useMethod of getting to school/college

The grey cells are where you will create your data entry points.

• Display the Forms toolbar which is shown below. Forms toolbar


( View-Toolbars – Forms) Familiarise yourself with the functions of the buttons on this toolbar.


Name field

- Position the cursor in the cell where they will type their last name (as shown in the diagram above) and use the text Form Field to create a data place for the SURNAME, 20 characters in size, ALL CAPS (use the Form Field Options button).

- Do the same for the First Name except use First Cap.

- Create a drop list for the type of computer using the Drop-Down Form Field.

- Types to be Pentium, Pentium II, Pentium III, Macintosh G3, Macintosh G4. You may add others if you wish.

- Create a drop list for the type of transport they use to get to college. Types to be bus, train, bike, car, walking.

- Save the form as a template in the appropriate folder.

- Protect the form – you will not be able to see the items from the drop lists until you protect and open a new document.

- Save it again.

- Close the document.

- Select File – New-Create new document. Choose your template.

- Enter the appropriate data for yourself.

- Save the document using the Save data from form option(you will find this in the save window under Tools - General Options) as yourname.txt onto your floppy disk.

- Close the document and then create another new document for a fictitious person. Save this as fictitious.txt.

Once you have saved the data into the text files you can then import the two files into a single database table. You can either create the data table first or create the table as you import the first example of form data.

Spreadsheet Template

Spreadsheets are used to perform calculations. Often a data entry person will be required to enter figures that are used to produce mathematically complex results. In addition to this when wage calculations are considered there are privacy, security and accuracy issues to be dealt with. For these reasons it is often necessary to create a template for users to enter data into specific cells and then see only the results they are entitled to view.Create a spreadsheet template

You will be required to create a spreadsheet that will calculate the wages of the employees of a section of a small organisation. The employees are only allowed to enter in the number of hours they have worked that week. The Section Manager is allowed to enter the base pay rate for the employees’ award, as well as the seniority pay scale. The Manager is also able to enter any overtime hours the employees work. You will need to password protect the template

An example of a possible spreadsheet is given for you to use as a basis for developing your own.

Sample Wages Spreadsheet

Tips on protecting worksheets

Sample Work Placement Project

Organisational Documents and Templates

This project is to be completed using your Work placement as a source of information.

Work Placement organisation name

...................................................

Short Description: Creating a set of complex documents and procedures intended to allow new users to create well-designed documents and files.

Assessment Type: Practical Project

Scenario

You have been employed to create a series of work place templates intended to allow novice users to create complex documents and files. These items will be created in such a way as to allow users to access a set of instructions if they require it. The links to various files should be dynamic (e.g. the organisation logo should be stored on the floppy disk and a dynamic link created from all of the other documents so that the logo can be updated in one place and all of the documents included will update automatically when next opened.)

Task 1

Create each of the following documents, paying attention to any other specific instructions given for individual items:

- Letterhead for the organisation you named above

- Inter/intra Office Memo

- Meeting minutes

- Entry on Duty Form

- Technology Fault Log

- Technology Inventory Sheet

You will also need to create a:

- database to collect the Entry on Duty information. This database is used to gather the information from the Entry on Duty form as a text file.

- spreadsheet to calculate a section’s wages. The general staff are only allowed to enter the hours they worked. The section manager is able to view the staff wages and is able to change the pay rate and also enter any overtime hours.

All documents are readily identified as organisation documents and each is to be linked to a help file. The help file should be searchable using the find command.

The organisation logo should be placed on all documents in an appropriate place and your name must appear as the author/ employee.

Task 2

Customise the applications software to:

- allow full menus to show in Word, Access and Excel

- make a: drive the default saving location.

All documents must be saved onto the one floppy disk.

Examples of some of the documents

- Inventory sheet

- Memo sheet

- Minutes sheet

Tuesday, September 11, 2007

ICAITTW011B Participate in a team and individually to achieve organization goals

ICAITTW011B
Participate in a team and individually to achieve organization goals


Training Providers
DescriptionThis unit expresses competency required to work individually and with others in an organisation

Elements of Competency and Performance Criteria
Key Competencies
Range Statement

· Work to be completed is identified.
· Work is prioritised according to organisation guidelines.
· Urgent requests are prioritised and acted on according to organisational guidelines.
I work to be completed in the research that I have step of the procedure below:
The Seven Steps of the Research Process
The following seven steps outline a simple and effective strategy for finding information for a research paper and documenting the sources you find. Depending on your topic and your familiarity with the library, you may need to rearrange or recycle these steps. Adapt this outline to your needs.
SUMMARY: State your topic as a question. For example, if you are interested in finding out about use of alcoholic beverages by college students, you might pose the question, "What effect does use of alcoholic beverages have on the health of college students?" Identify the main concepts or keywords in your question.
SUMMARY: Look up your keywords in the indexes to subject encyclopedias. Read articles in these encyclopedias to set the context for your research. Note any relevant items in the bibliographies at the end of the encyclopedia articles. Additional background information may be found in your lecture notes, textbooks, and reserve readings.
SUMMARY: Use keyword searching for a narrow or complex search topic. Use subject searching for a broad subject. Print or write down the citation (author, title,etc.) and the location information (call number and library). Note the circulation status. When you pull the book from the shelf, scan the bibliography for additional sources. Watch for book-length bibliographies and annual reviews on your subject; they list citations to hundreds of books and articles in one subject area. Check the standard subject subheading "--BIBLIOGRAPHIES," or titles beginning with Annual Review of... in the Cornell Library Catalog.
SUMMARY: Use periodical indexes and abstracts to find citations to articles. The indexes and abstracts may be in print or computer-based formats or both. Choose the indexes and format best suited to your particular topic; ask at the reference desk if you need help figuring out which index and format will be best. You can find periodical articles by the article author, title, or keyword by using the periodical indexes in the Library Gateway. If the full text is not linked in the index you are using, write down the citation from the index and search for the title of the periodical in the Cornell Library Catalog. The catalog lists the print, microform, and electronic versions of periodicals at Cornell.
SUMMARY: Use search engines and subject directories to locate materials on the Web. Check to see if your class has a bibliography or research guide created by librarians.
SUMMARY: See How to Critically Analyze Information Sources and Distinguishing Scholarly from Non-Scholarly Periodicals: A Checklist of Criteria for suggestions on evaluating the authority and quality of the books and articles you located. If you have found too many or too few sources, you may need to narrow or broaden your topic. Check with a reference librarian or your instructor.When you're ready to write, here is an annotated list of books to help you organize, format, and write your paper.

STEP 7: CITE WHAT YOU FIND USING A STANDARD FORMAT
SUMMARY: Give credit where credit is due; cite your sources.Citing or documenting the sources used in your research serves two purposes, it gives proper credit to the authors of the materials used, and it allows those who are reading your work to duplicate your research and locate the sources that you have listed as references.

Participate in team structure

· Members and roles of team are identified.
· Tasks and goals are identified and acted on.
· Assistance is sought from team members when necessary.
· Feedback is given and received to ensure organisation goals are met.
THEERASAK's Company

Team Structure

Team StructureIn industry and elsewhere there is an increasing trend towards the use of teams to perform tasks. As a result, a common complaint coming from industry is that the current college graduates are inexperienced with working in a team environment. We in Briggs are taking every opportunity to give students some practice in forming and working in teams; as you will see, it is not as easy and natural a process as it may at first appear.

Some things to learn are:

- how to quickly establish a working relationship with strangers
- how to work with people even when there are some incompatibilities in personality
- how to assign responsibilities within the group
- how to be a contributing member of the group

I have found that the process works best when I assign teams; otherwise people tend to link up with friends and others of the same mathematical ability level. By the second class meeting I will have set up teams and assigned seating so that teams will sit together in lecture. Rather than lecture all the time, I will be encouraging active participation by having the class work through some example problems as teams. Every team member will be assigned a specific function:

- team leader This person guides the discussion and problem solving

- scribe This person reports the team attendance at each lecture and writes up anything handed in.
- communicator This person comes to me for additional help or clarification and ensures that everyone understands.

Team member and role of team

Leader : Leaders in the group are responsible for keeping the team meetings heading in the right direction. They are also responsible for maintaining group interaction and participation.

Time Keeper : The time keeper is responsible for remembering due dates and reminding the team of those dates. The time keeper also makes sure that the meetings remain efficient and productive.
Scribe: The scribe is responsible for note taking during the meetings. The scribe also types contact information and emails all the team members the needed materials.
Critical Evaluator: One or more team members will be responsible for critically evaluating the team’s ideas and work. This role will allow the team to create the best product possible.
Motivator: Another position that can be rotated throughout the team is the position of motivator. The motivator will be responsible for maintaining the team’s high spirits and helping to build cohesiveness.
Coordinator : This person will have a clear view of the team objectives and will be skilled at inviting the contribution of team members in achieving these, rather than just pushing his or her own view. The coordinator (or chairperson) is selfdisciplined and applies this discipline to the team. They are confident and mature, and will summarise the view of the group and will be prepared to take a decision on the basis of this.
Shaper : The shaper is full of drive to make things happen and get things going. In doing this they are quite happy to push their own views forward, do not mind being challenged and are always ready to challenge others. The shaper looks for the pattern in discussions and tries to pull things together into something feasible which the team can then get to work on.
Plant : This member is the one who is most likely to come out with original ideas and challenge the traditional way of thinking about things. Sometimes they become so imaginative and creative that the team cannot see the relevance of what they are saying. However, without the plant to scatter the seeds of new ideas the team will often find it difficult to make any headway. The plant’s strength is in providing major new insights and ideas for changes in direction and not in contributing to the detail of what needs to be done.
Resource investigator : The resource investigator is the group member with the strongest contacts and networks, and is excellent at bringing in information and support from the outside. This member can be very enthusiastic in pursuit of the team’s goals, but cannot always sustain this enthusiasm.
Implementer : The individual who is a company worker is well organised and effective at turning big ideas into manageable tasks and plans that can be achieved. Such individuals are both logical and disciplined in their approach. They are hardworking and methodical but may have some difficulty in being flexible.
Team worker : The team worker is the one who is most aware of the others in the team, their needs and their concerns. They are sensitive and supportive of other people’s efforts, and try to promote harmony and reduce conflict. Team workers are particularly important when the team is experiencing a stressful or difficult period.
Completer : As the title suggests, the completer is the one who drives the deadlines and makes sure they are achieved. The completer usually communicates a sense of urgency which galvanises other team members into action. They are conscientious and effective at checking the details, which is a vital contribution, but sometimes get ‘bogged down’ in them.
Monitor evaluator : The monitor evaluator is good at seeing all the options. They have a strategic perspective and can judge situations accurately. The monitor evaluator can be overcritical and is not usually good at inspiring and encouraging others.
Specialist : This person provides specialist skills and knowledge and has a dedicated and single-minded approach. They can adopt a very narrow perspective and sometimes fail to see the whole picture.
Finisher : A person who sticks to deadline and likes to get on with things. Will probably be irritated by the more relaxed member of the team.
Goals and Tasks of team
Goals
- Are what the user wants to do, but not how the user achieves them
- Do not to make any assumptions about the system interface
- Can be used to compare different interface design alternatives in a fair way
- Can be personal, practical, or false (don't focus on false goals!)
Tasks
- Describe the steps necessary to achieve the goals
- Can vary with the available technology
- Are broken down into steps for task analysis, and are recombined into sequence of steps for scenario development (next assignment)

Glossary

Team members
Variables may include but are not limited to: peers, supervisors and other members of the organization; people from a range of social, cultural or ethnic backgrounds; autonomy and responsibility of the team; responsibility of team members; life of the team.

Organization
Variables may include but are not limited to: organisational charts and work-flow guides; time line for tasks and goals; critical ratings policy.

Tools and resources
For time management such as, diaries, personal organizers.

Leadership
Leadership styles of team leader.

Client User
May be a department with the organization or a third party and so the relation and ease of access will vary.

Documentation and Reporting
Audit trails, naming standards, version control.

OH and S Standards
As per company, statutory and vendor requirements. Ergonomic and environmental factors must be considered during the demonstration of this competency.

Organizational Standards
May be based upon formal, well documented methodologies or non-existent. For training delivery purposes best practice examples from industry will be used.

Evidence Guide

Underpinning knowledge of


· Principles of ethical work practice for example, when participating in teams.· Roles and responsibilities of individual team members.
· General understanding of social and organizational systems for when participating in teams.
· Results orientated approaches, for example when establishing ones own work schedule.
· Organizational structure and Information Technology division structure so as to inform own and team work practices.
· General organizational strategic direction and values soas to inform own and team work practices.
· General work team processes and group dynamics for example, when participating in teams.

Underpinning skills in
· Decision making between a limited range of options, for example, when prioritizing work according to organization guidelines.
· Assertiveness, for example, when identifying team roles.

Monday, September 10, 2007

ICAITTW002B Communicate in the IT workplace

ICAITTW002B
Communicate in the IT workplace
On completion of this unit learners should be competent in promoting professional client support through verbal and non-verbal communication. This Unit incorporates a broad knowledge of OH & S principles, organisational Policy and Procedures and the ability to process information and establish contact with both internal and external clients.

This Unit includes:
- Establishing contact with clients
- Processing information

Glossary

Active Listening
Responding to what you hear, indicating you are listening.

Aggressive
To put others down, only see your point of view, pushy and abusive at times.
Assertive
To be clear and honest when speaking about your feelings and respect the rights and needs of others without making judgements.

Body Language
Movement of the body and facial expressions to communicate.

Communicate
Successfully convey an idea from one person to another using some form of medium – verbal, non verbal.

Communication Breakdown
Failure to communicate or be understood for some reason.

Compose
To produce or put together an idea, usually written.

Empathy
The ability to see things from the other person’s point of view.

Feedback
Any reply to a message.

Internal Client
Other workers within the same organisation.

Interpretation
What the receiver understands from the communication and what they get from it.

Medium
The method or channel you choose to send the message by – verbal, written, visual, non-verbal.

Message
What you want to communicate – an idea, instruction, request, statement.

Non Verbal
Without talking (words)

Oral
By way of speaking in words.

Passive
When you do not clearly communicate what you think or feel.

Pessimists
People who always seem to see the negative side of things.

Receiver
The person/s who you want to communicate with.

Screening Calls
Listening to the caller and asking questions to establish the purpose of the call, then make a decision based on this information and the company policy.

Stereotypes
Judging or classifying people into a particular category according to appearance, behaviour, clothes or a belief.

Activities

Exercise 1
In its simplest form communication can be described as a process and demonstrated in the following model:


Simple Model of the Communication Process

Using this model, think about the different types of mediums you can use in your communication to send a message to someone.

Answer Exercise 1

Different kinds of medium:
- Conversation ,Telephone ,Fax ,E-mail ,Meetings ,Letters ,Memos , Reports ,Demonstration,Observation ,Diagrams ,Symbols ,Body language ,Video ,Audio tape ,Advertisement

Exercise 2
Consider all the different forms of media used for communication and place a tick in the boxes you think would be the most appropriate for the message being sent. There may be more than one choice.

Exercise 3

Questions
- For any kind of communication to take place, whether it is verbal, non-verbal, written or via computers, there are two main components – what are they?
- What kinds of ‘hindrances’ can cause bad or poor communication to occur?
- How can you tell if someone is listening to you?
- It is always better to make a __________________ rather than command or order someone to do something.
- Communication is a ____________ process.
- Besides passive communicators there are two other main types, what are they?
- List some of the differences between these main types of communication styles:


Answer Exercise 3
- Sender and Receiver.
- Noise, poor medium, misunderstanding, personal problems, feeling unwell.
- Body language, head gestures, facial expressions.
- Suggest or request.
- Two-way.
- Aggressive and Assertive
- Aggressive – hurtful, forceful, self-opinionated, commanding; Assertive – Clear and honest, respects the rights of others, requests rather than commands.


Case study 1

Read the following scenario and list the communication and customer service faults.
Robert Martin needed some information on the latest accounting software available from the local Computer Store.
Robert experienced the following:
There was no one at the counter when he walked in, so he looked around the store for a while, then went back to the counter and called out for someone.
A sales person finally appeared complaining about the end of month paper work and how there was not enough time in the day and there were too many interruptions!
Before Robert had time to finish his enquiry the phone rang and the sales person answered the call, which took several minutes to complete.
He finally got to finish his enquiry but the sales person felt there was someone else better suited to answer his questions, so called a second person to the counter.
Robert then had to repeat everything again.
The sales person did not seem too interested in his needs and talked him into buying a different version of the accounting software, which cost more.
Robert went away feeling like he had been “fobbed off”, but was pleased to finally have his software.
When he tried installing it however, he discovered the hardware did not support that version of the accounting software, at which point he became very angry and frustrated.
After identifying the customer service faults, write a letter of complaint to the manager of the computer store and make some suggestions towards improving their communication and service techniques.

Your address
Your telephone number/s

Date

Name (if available)
Title (if no specific name, use Customer Service Manager or General Manager or similar – you can ring to check)

Address


Dear (as appropriate)

State what you bought, when and where (including serial numbers where appropriate). Or, what work you had done, when, where and by whom.

State the problem you have with the product, the work or the service and why you have this problem. Give as many relevant details as you can. If it is a long story, it is a good idea to attach a separate schedule of what happened in time order.

Include copies of any relevant documentation (eg. receipts, warranties, letters, guarantees, contracts). List what you are including. Don’t send originals – keep those yourself.

State what action you want taken to resolve your complaint.

Give a precise but reasonable timeframe for that action to be taken, eg. 10 working days.

State that if you do not hear from them, you will be taking your complaint to …. (the relevant complaints agency).

Include details of when and how you may be contacted.

Yours sincerely

Your signature
Your name (printed)

(http://www.complaintline.com.au/sampleletter.doc)


Exercise 4
Compose a memorandum to all Helpdesk staff, from you as the IT Services Manager advising them of the list of questions they must ask clients when they log a call for help:
Date, time, name of client, where they are from, what was the user trying to do when the problem occurred? Has this happened before? Write down exact wording of any error messages, Which application were they using? Did they try re-booting?
Include all this information on the log sheets provided.
Key in memorandum or use a memo template from Word.

Answer

Sample Memorandum

Exercise 5

Telephone technique
- What are some of the advantages of using telephones?
- How would you describe correct courtesy and preferred greeting when using the telephone?
- Briefly list the main points to consider when answering an incoming call.
- Briefly list the main points to consider when making an outgoing call.
- To ensure effective communication, you must speak _________, using a _______tone and speaking at a speed that can be easily ____________.
- What are two time-wasters that callers are most resentful of?
- List the main steps you should take when preparing to make a telephone call.
- When concluding a telephone conversation you may have to ________the key points.

Answer Exercise 5

- Advantages: Instant response, speak to someone in person over long distance, they can save time, issues can be clarified over the phone – reducing travel time and unnecessary delays.
- Courtesy: Respect what the other person has to say, don’t interrupt or cut them off before they are finished. Be polite at all times, even if they are abusive or upset. The success of the conversation relies on this kind of courtesy. Greeting: A pleasant greeting, which will be different depending on whether you are making or receiving the call. It is the first impression and can decide how the remainder of the conversation will go.
- Answer with a greeting such as “Good morning/afternoon”, then identify the name of your company/organisation/department followed by your name and ask, “How may I help you”. If you can not assist then you should be able to direct them to someone who can.
- Outgoing call: You may need to organise some information or questions before making the call – be organised. Identify yourself, ask for the person you wish to speak to or state what you need so you can be directed to the right person, then outline the purpose of the call or ask questions.
- You must speak clearly, using a pleasant tone... that can be easily understood.
- Time-wasters: Waiting for the phone to be answered or being put on hold for a long period especially without someone keeping them informed as to how much longer it might be.
- Preparing: In the workplace in particular, a lot of time can be wasted if you have not prepared what you need before making a call – having all the required information at hand and knowing exactly what you need to say or ask is very important. Write down a series of questions or have a list of specific points in front of you so nothing is overlooked. Taking notes during the conversation so nothing is forgotten – Do not rely on your memory.
- You may have to repeat the key points.


Exercise 6

You are working for the Bits & PCs Computer Company and your supervisor has asked you to fax a client regarding some delayed stock, which they were expecting from your company.

Compose a fax using a Fax Template from Word. Briefly apologise for the delay in delivering the printer cartridges and copy toners they ordered on 25 September and that since these items are now in stock they will be delivered to their office on Friday 5 October.


Comments:
We apologise for the delay in delivering the printer cartridges and copy toners your ordered on 25 September.
These items have now come into stock and will be delivered to your office on Friday 5 October.
Please do not hesitate to contact us if there is any further problem.


Sample project
Communicate in the IT Workplace
You are to use the following case study to answer all the questions.
Read through it carefully and then refer to this situation as you answer each question.
Imagine that you work in a computer sales and repair shop. Mrs Penn comes in on Tuesday morning. The digital video camera she bought from you a month ago has been damaged in an accident. She put it in for repairs at your shop two weeks ago last Friday. She has not heard from anyone and she needs the camera for a special videoconference she has arranged with her family overseas, next Saturday.
Promoting client satisfaction
- How would you and an observer know if Mrs Penn went away feeling satisfied?

Acting consistently with employer’s needs

- What would you say to actively promote the image of Bits & PCs? - What would you say to reassure Mrs Penn that her decision to buy the Camera was a wise one?
- How would you check with Mrs Penn that you had understood her main need in this situation?
- What reasonable solution could you find to the problem of the slowness of the repairs?
In the event that it cannot be fixed in time for the videoconference, what will you suggest for her?

Interpersonal Skills
- Write down four interpersonal skills your employer would like to see you use in a situation like this.
- What interpersonal skills would you as a client like to find in someone helping you?

Telephone Technique
- How would you answer the telephone?
- How would you greet Mrs Penn once she had identified herself?

Questioning Techniques
- Give two examples of open-ended questions you might ask Mrs Penn.
- Give one example of a closed question you would ask Mrs Penn.

Active Listening
- Write one response that shows that you really heard what she said?
- Write one response that shows that you understood and empathised with her.
- Write down four ‘listening responses’ you would use in your exchange.

Service follow-up
- List three things that you and Mrs Penn could agree on jointly as a course of action. These would be things that either you or your boss or she would do.
- How would you check that she was happy with this proposed course of action?
- How would you re-check important details like phone numbers and times?